 Save to Pinterest
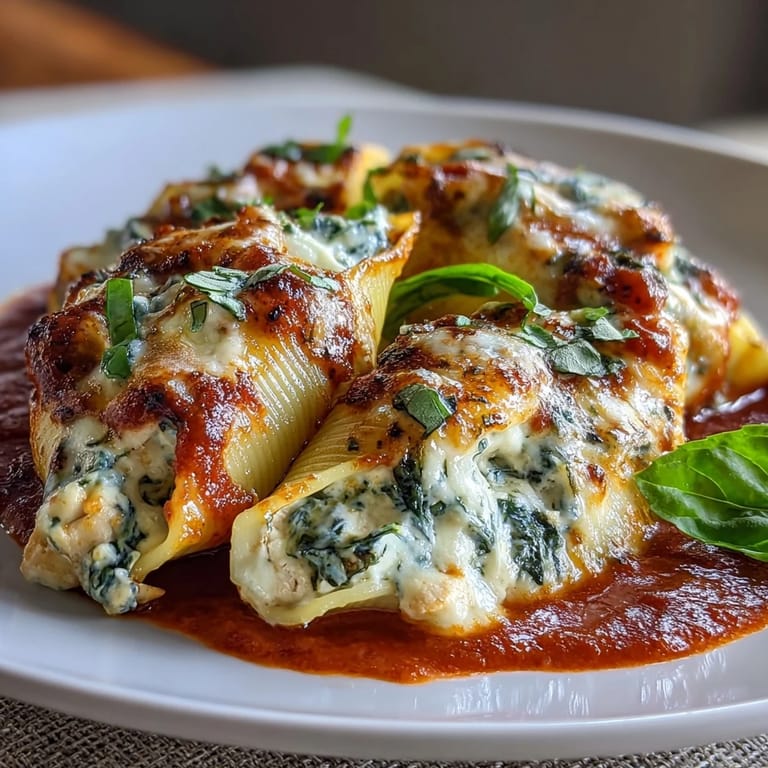
 My sister called one Tuesday evening asking if I could bring dinner to her place—she'd just started a new job and was exhausted. I found myself standing in my kitchen, wanting something that felt indulgent but wouldn't derail the healthy eating she'd been committed to, and these pesto chicken stuffed shells came together almost by accident. The combination of creamy Greek yogurt with bright basil pesto seemed like the kind of compromise that actually tastes better than the original, and watching her face light up when she realized it was both delicious and protein-packed made the whole thing worthwhile.
There's something about the ritual of stuffing shells that makes cooking feel meditative—each one takes just a moment, but the repetition becomes almost calming. I was doing this one Saturday afternoon when my nephew wandered into the kitchen asking what smelled so good, and by the time the dish came out of the oven, he'd convinced me to let him help garnish it with fresh basil. That kind of thing happens a lot with this recipe; it invites people in.
Ingredients
- Jumbo pasta shells (16 count): These need to be truly jumbo—the smaller shells tear easily and won't hold the filling properly, a lesson I learned the hard way before I started checking the actual package size.
- Cooked chicken breast (2 cups, shredded): Use rotisserie chicken if you're short on time, or poach your own if you want to control the seasoning; either works beautifully here.
- Plain Greek yogurt (1/2 cup): Non-fat or low-fat both work, but the tanginess of Greek yogurt is what makes this lighter version sing where regular ricotta would feel heavy.
- Basil pesto (1/4 cup): Store-bought is fine, though homemade tastes brighter; just taste your filling and adjust salt accordingly since pesto can vary wildly in saltiness between brands.
- Grated Parmesan cheese (1/4 cup): Freshly grated is worth the extra thirty seconds—it melts more smoothly and tastes less salty than pre-shredded versions.
- Part-skim ricotta cheese (1/2 cup): This adds body and richness without overwhelming the lighter yogurt base.
- Baby spinach, chopped (1 cup): Raw spinach works fine here; it softens completely during baking and adds nutrition without changing the flavor.
- Salt and black pepper (1/4 teaspoon each): Start conservative since both the pesto and cheeses are already salty.
- Garlic, minced (1 clove): One clove is enough; more than that can overpower the delicate pesto flavoring.
- Marinara sauce (2 cups): Use your favorite brand or homemade; the sauce is your foundation, so pick one you'd actually want to eat on pasta.
- Part-skim mozzarella cheese, shredded (1/2 cup): This is what gets bubbly and gorgeous on top, so don't skip it.
- Fresh basil leaves (optional garnish): A small handful of fresh basil added at the very end brings brightness back to a dish that's been in the oven.
Tired of Takeout? 🥡
Get 10 meals you can make faster than delivery arrives. Seriously.
One email. No spam. Unsubscribe anytime.
Instructions
- Heat your oven and prepare the pan:
- Get your oven to 375°F and lightly grease a 9x13-inch baking dish with oil or cooking spray. Having everything ready before you start cooking means you won't have that panicked moment halfway through.
- Cook the shells until just tender:
- Bring salted water to a rolling boil, add your jumbo shells, and cook according to package directions—usually about 9 to 11 minutes—until they're al dente and pliable but still have a tiny bit of firmness. The shells will cook a bit more in the oven, so don't go soft.
- Make the filling blend:
- While the pasta cooks, combine your shredded chicken, Greek yogurt, pesto, Parmesan, ricotta, chopped spinach, garlic, salt, and pepper in a large bowl. Stir everything together until it's completely blended and no streaks of yogurt remain, then taste it and adjust the seasoning to your preference.
- Build the base layer:
- Spread 1 cup of your marinara sauce across the bottom of your prepared baking dish in an even layer. This prevents sticking and ensures every bite gets some sauce.
- Stuff and arrange the shells:
- Once your cooked shells have cooled enough to handle, spoon 2 to 3 tablespoons of the filling into each one, arranging them seam-side up in the baking dish. Work gently so the shells don't crack, and it's okay if some filling peeks out at the edges.
- Top with remaining sauce and cheese:
- Spoon the remaining marinara sauce over all the stuffed shells, making sure each one gets a good coating. Sprinkle the shredded mozzarella evenly over the top so it will melt into a bubbly, golden layer.
- Bake covered, then uncovered:
- Cover the baking dish tightly with aluminum foil and bake for 25 minutes to let everything heat through gently. Then remove the foil and bake for another 10 minutes until the cheese is melted and the edges are bubbling.
- Finish and serve:
- Let it cool for just a minute or two so you don't burn your mouth, tear some fresh basil over the top if you have it, and serve while everything is still hot and the cheese is at its best.
 Save to Pinterest
  Save to Pinterest
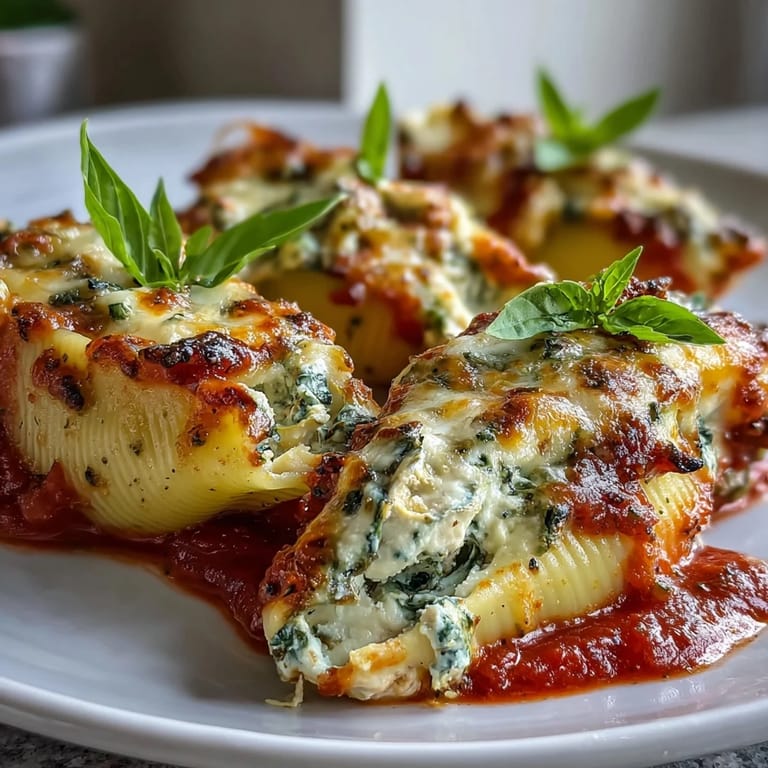
 The first time I served this to friends who were watching their intake, they were genuinely surprised when I told them the calorie count. There's something deeply satisfying about a meal that doesn't feel like you're missing out on anything, and that's what this dish delivers.
Why Greek Yogurt Changes Everything
The magic of substituting Greek yogurt for some of the traditional ricotta is that you get creaminess without the density, plus a subtle tang that plays beautifully against the pesto. The protein content goes up, the fat content goes down, and honestly, it tastes fresher. I've made this both ways—traditional and with the yogurt swap—and I'll never go back to the original version.
The Pesto Question
Store-bought pesto is completely acceptable here and saves you the mess of a food processor, but if you're making your own, you'll notice immediately how much brighter and fresher it tastes. The trade-off is that homemade versions have less salt, which means you need to taste your filling and adjust seasoning before you stuff the shells. Either way works; it just changes how you approach seasoning.
Make-Ahead Strategy and Storage
You can prepare the entire dish through the topping step up to 24 hours ahead of time, cover it tightly with plastic wrap, and refrigerate. Just add 10 to 15 minutes to the initial baking time if it's coming straight from the fridge. Leftovers keep beautifully in the refrigerator for three days, and reheating in a low oven keeps the shells tender while warming everything through evenly.
- Freeze unbaked assembled shells in individual portions for easy grab-and-bake weeknight dinners that come together in under an hour.
- Double the filling recipe and use it to top baked chicken breasts or spread into portobello mushroom caps for variety.
- If you make extra filling but run out of shells, it freezes well in an airtight container for up to two months.
 Save to Pinterest
 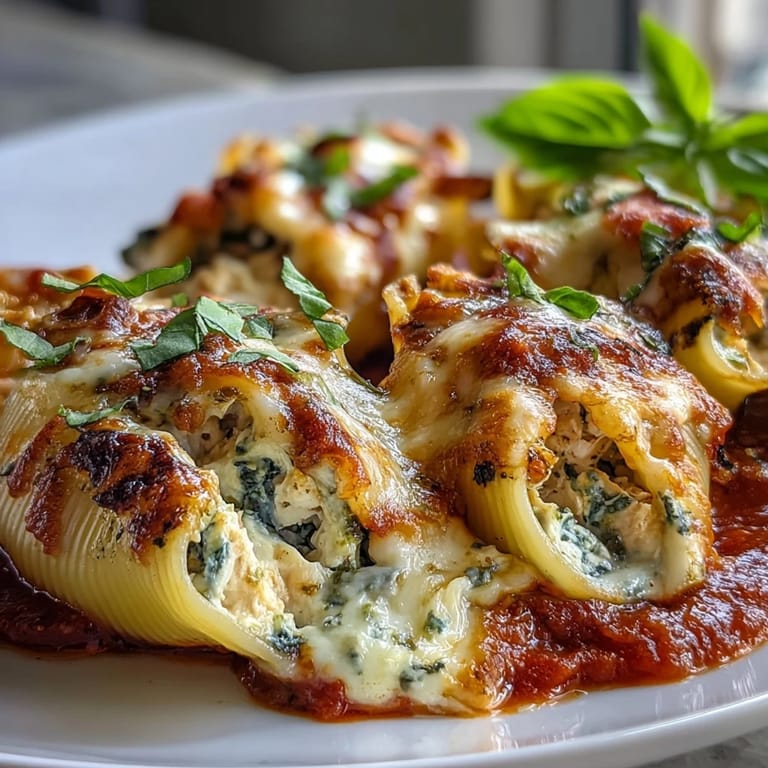 Save to Pinterest
 This is the kind of dish that sits at the intersection of comfort and nutrition, where nobody feels like they're eating lighter food because it simply tastes too good. Make it once and it becomes a regular rotation in your kitchen.
Recipe FAQs
- → Can I make these stuffed shells ahead of time?
Yes, assemble the entire dish up to 24 hours in advance, cover tightly, and refrigerate. Add 5-10 minutes to baking time if baking cold from the refrigerator.
- → What can I substitute for Greek yogurt?
Cottage cheese blended smooth or low-fat cream cheese work well as alternatives. The texture will remain creamy while keeping the dish light.
- → How do I prevent shells from tearing?
Cook pasta 1-2 minutes less than package directions, rinse immediately with cold water to stop cooking, and handle gently when stuffing.
- → Can I freeze these stuffed shells?
Assemble and freeze before baking, wrapped tightly for up to 3 months. Thaw overnight in refrigerator and bake as directed, adding 10-15 minutes if needed.
- → What's the best way to shred chicken?
Use two forks to pull apart cooked chicken breasts, or place in a stand mixer with paddle attachment for quick, even shredding.