 Save to Pinterest
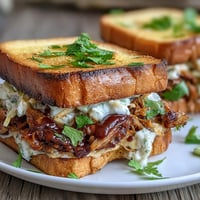
 My roommate in college made one of these for me after I'd spent three hours studying for an exam I was convinced I'd fail. She'd raided the kitchen for whatever we had—some bread, cheddar slices, and a jar of mayo she swore would work better than butter. The golden crust that came out of that skillet was the first thing that day that actually made sense. I learned right then that sometimes the best discoveries come from working with what's already on hand, not from following some complicated recipe.
Years later, I made a batch of these for my daughter's friends after soccer practice, and I watched them go quiet the moment they bit into that warm cheese and crispy bread. One kid asked if this was from a restaurant—she genuinely couldn't believe it came from our kitchen. That's when I realized this isn't just a sandwich; it's the kind of small thing that makes people feel looked after.
Ingredients
- White or sourdough bread, 4 slices: Sourdough gives you a nuttier flavor and slightly more structure, but white bread works beautifully too—just make sure it's fresh enough to toast nicely without tearing.
- Cheddar cheese, 4 slices: Sharp cheddar has more personality than mild, but use whatever melts well and tastes good to you; Gruyère and Monterey Jack are wonderful substitutes.
- Mayonnaise, 2½ tablespoons: This is the secret—mayo has enough fat and emulsifiers to brown the bread faster and more evenly than butter ever could, and it adds a subtle richness to the crust.
- Dijon mustard, 2 teaspoons (optional): A thin stripe of mustard on the inside adds a gentle tang that wakes up the cheese without overpowering it.
Tired of Takeout? 🥡
Get 10 meals you can make faster than delivery arrives. Seriously.
One email. No spam. Unsubscribe anytime.
Instructions
- Set up your workspace:
- Lay out all four bread slices and have your cheese, mayo, and mustard close by so you're not hunting around once you start cooking.
- Coat the bread:
- Spread a thin, even layer of mayo on one side of each slice—you want enough to brown beautifully but not so much that it oozes out and makes things greasy. If you're using mustard, spread it thinly on the opposite side of two slices.
- Build your sandwiches:
- Place two cheese slices between two bread slices, mayo-sides facing out toward the pan. The cheese in the middle means it gets surrounded by heat and melts evenly.
- Heat your pan:
- Use medium-low heat on a nonstick skillet—this is important because high heat will scorch the bread before the cheese has time to soften.
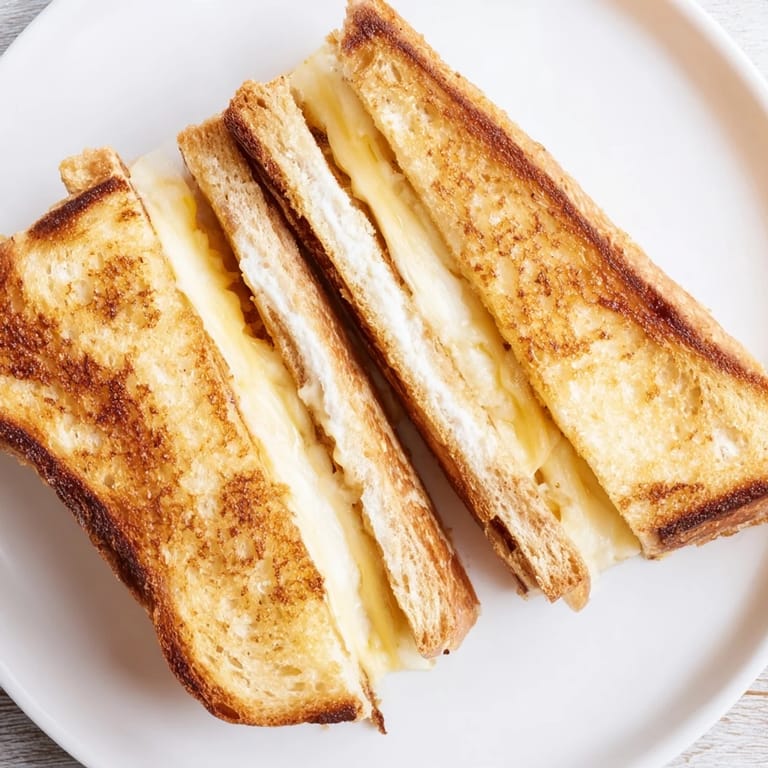
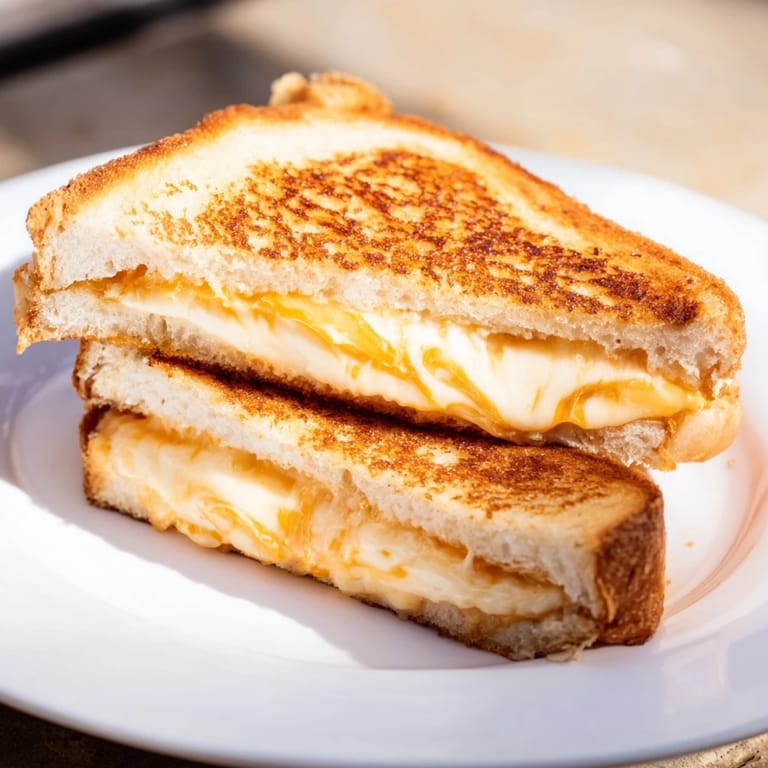
- Cook the first side:
- Place the sandwiches mayo-side down and let them sit for three to four minutes without moving them; you'll hear the gentle sizzle quiet down as the moisture cooks off and the crust starts to form. When you peek, it should be deep golden.
- Flip and finish:
- Flip carefully, then cook the other side for three to four minutes while pressing gently with your spatula—this helps the cheese meld and the bread brown evenly. You're looking for that same golden color on both sides.
- Rest and serve:
- Let each sandwich rest on the plate for a minute so the cheese sets slightly and stays inside the bread instead of leaking everywhere.
 Save to Pinterest
 I once made these for a friend who was going through a rough breakup, and she showed up at my door and we sat on the porch eating warm sandwiches and talking until the sun went down. Nothing fancy, nothing complicated—just something made with care that somehow said more than words could.
Why Mayo Works Better Than You'd Think
The first time I heard about using mayo instead of butter, I was skeptical. But mayo contains lecithin and eggs, which emulsify and conduct heat differently than solid butter does, creating a crust that browns more evenly and gets crisper without burning. It also carries flavor—good mayo has its own subtle richness—so the sandwich tastes slightly deeper than one made with plain butter. Once I understood the science, it clicked why my roommate's version had been so much better than my homemade-butter attempts.
Making It Your Own
The beauty of this sandwich is that it's a canvas. Some mornings I add thin tomato slices or caramelized onions I made the night before; other times I slip in crispy bacon or a few arugula leaves if I'm feeling fancy. I've even spread a tiny bit of pesto on the inside, or topped the cheese with a thin slice of good ham. The technique stays exactly the same—you're just building on the foundation.
Pairing and Serving
This sandwich is at its best with something warm beside it—tomato soup is the classic pairing, but creamy mushroom soup or even a simple bowl of broth works beautifully. Serve it right away while the cheese is still molten and the bread is warm; that's when all the textures are at their peak. Here are a few final thoughts to make sure it comes out perfect every time:
- Use room-temperature mayo so it spreads easily without tearing the bread.
- If your bread is thick-sliced, cook it slightly longer on each side so the cheese has time to properly melt.
- A cast-iron skillet works just as well as nonstick if that's what you have, though you'll want to use medium heat instead of medium-low.
 Save to Pinterest
 This is the kind of sandwich that reminds you that the best food doesn't have to be complicated—it just has to be made with a little attention and a little care. Make it for someone, or make it for yourself when you need something warm and honest.
Recipe FAQs
- → Why use mayonnaise instead of butter for grilling?
Mayonnaise creates an evenly browned, crispy crust with a slight tang, producing a richer flavor than butter.
- → Can I substitute the cheese used here?
Yes, melting cheeses like Monterey Jack, Gruyère, or mozzarella work well for smooth, gooey texture.
- → What bread types work best for this sandwich?
White or sourdough bread yield crispy, golden results and hold the melted cheese nicely.
- → How does Dijon mustard affect the flavor?
Dijon adds a mild sharpness and complexity that complements the creamy mayo and cheese layers.
- → Can I add extras to the sandwich?
Try sliced tomatoes, caramelized onions, or crispy bacon for enhanced flavor and texture variety.